
Exploring Reverse Proxies in My Homelab: From Nginx Proxy Manager to Traefik
When I completed my homelab project, I was excited by its endless possibilities. Suddenly, I could experiment freely without worrying about accidentally breaking something important. Before setting up my dedicated homelab environment, I had no choice but to test and practice directly on my primary workstation, an approach that inevitably carried significant risks. A safe, isolated environment means I can confidently plan, test, and implement new ideas without impacting my day-to-day tasks or productivity.
One key area I was eager to explore was the use and deployment of reverse proxies, a crucial component in many enterprise IT infrastructures. Initially, I considered using Nginx Proxy Manager, a well-known solution in the homelab community. Nginx Proxy Manager simplifies exposing internal web services securely to the Internet and automates obtaining SSL certificates through Let’s Encrypt, significantly streamlining the process of securing web applications.
A reverse proxy is an intermediary server that forwards client requests to backend services or servers. It’s helpful in homelab setups for:
- Securing access with SSL/TLS encryption.
- Simplifying external access to internal services (Nextcloud, Plex, Docker apps, etc.).
- Managing multiple services under one domain or IP address.
- Handling authentication, access control, and load balancing.
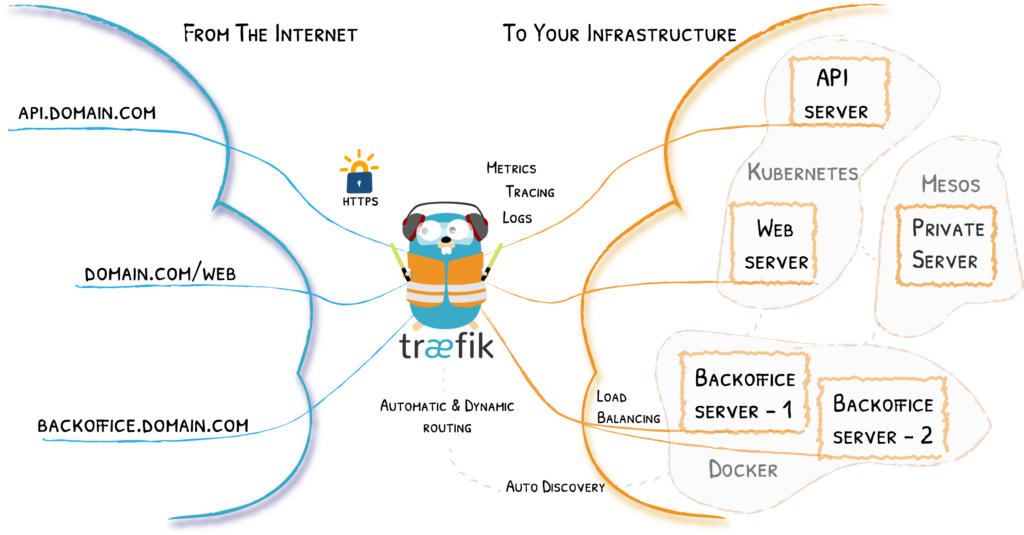
However, I decided to challenge myself further by exploring Traefik Proxy, an open-source solution similar in concept to Nginx Proxy Manager but with distinct advantages, particularly well-suited to enterprise scenarios. Traefik offers several powerful features that intrigued me:
- Native Integration with Container Orchestration Platforms:
- Seamlessly integrates with technologies like Kubernetes and Docker Swarm, automatically detecting and configuring services without manual intervention.
- Dynamic Configuration:
- Automatically adapts to infrastructure changes, eliminating the need for manual reloads or restarts whenever services or routes are modified.
- Built-in Metrics, Tracing, and Advanced Load Balancing:
- It provides native observability, detailed metrics, and efficient load-balancing capabilities, ideal for managing complex microservice architectures.
- Cloud and Platform Compatibility:
- Compatible with cloud platforms such as AWS, making it an excellent choice for hybrid or multi-cloud environments.
- Scalability for Microservices:
- Explicitly designed to scale gracefully in environments running numerous microservices, this is a typical pattern in modern enterprise applications.
Traefik’s robust feature set made it particularly appealing. I aimed to gain practical, hands-on experience with tools widely adopted in large-scale, production-level environments. By embracing Traefik, I took another important step toward deepening my technical expertise and preparing myself for future professional opportunities in the IT industry.
Overview
| Feature | Nginx Proxy Manager | Traefik |
| Core Tech | Nginx (traditional reverse proxy) | Native Go-based proxy/load balancer |
| UI | Built-in Web UI (very user-friendly) | Dashboard (for monitoring); config via files or labels |
| SSL (Let’s Encrypt) | Automatic, via UI | Automatic, fully integrated |
| Docker Integration | Good (manual container setup) | Excellent (dynamic routing via labels) |
| Load Balancing | Basic (round robin via Nginx config) | Built-in advanced (sticky sessions, etc.) |
| Routing Logic | Manual configuration | Dynamic, rule-based (host, path, headers, etc.) |
| Ease of Setup | Very easy, great for beginners | Moderate, better for intermediate users |
| Performance | High | Very high, especially at scale |
My Docker compose file for Traefik
secrets:
  cf-token:
    file: ./cf-token   # contains only your Cloudflare API token

services:
  traefik:
    image: traefik:v3.0   # or traefik:v3.3 to pin a version
    container_name: traefik
    restart: unless-stopped
    security_opt:
      - no-new-privileges:true   # helps to increase security
    secrets:
      - cf-token   # see secret at the top
    networks:
      - proxy
    ports:
      - "80:80"
      - "443:443"
      # - "10000:10000" # optional
      # - "33073:33073" # optional
    environment:
      - TZ=Europe/London                  # set your timezone
      - CF_API_EMAIL=<your-cloudflare-email>  # Cloudflare email (optional if using token only)
      - CF_DNS_API_TOKEN_FILE=/run/secrets/cf-token
    volumes:
      - /etc/localtime:/etc/localtime:ro
      - /var/run/docker.sock:/var/run/docker.sock:ro
      - ./config/traefik.yaml:/traefik.yaml:ro
      - ./config/acme.json:/acme.json
      - ./config:/etc/traefik/config:ro
      - ./logs:/var/log/traefik
    labels:
      - "traefik.enable=true"

      # HTTP router with redirect
      - "traefik.http.routers.traefik.entrypoints=http"
      - "traefik.http.routers.traefik.rule=Host(`traefik.example.com`)"
      - "traefik.http.middlewares.traefik-https-redirect.redirectscheme.scheme=https"
      - "traefik.http.routers.traefik.middlewares=traefik-https-redirect"

      # HTTPS secure router with auth + CrowdSec
      - "traefik.http.routers.traefik-secure.entrypoints=https"
      - "traefik.http.routers.traefik-secure.rule=Host(`traefik.example.com`)"
      - "traefik.http.routers.traefik-secure.tls=true"
      - "traefik.http.routers.traefik-secure.tls.certresolver=cloudflare"
      - "traefik.http.routers.traefik-secure.tls.domains[0].main=example.com"
      - "traefik.http.routers.traefik-secure.tls.domains[0].sans=*.example.com"
      - "traefik.http.routers.traefik-secure.service=api@internal"
      - "traefik.http.routers.traefik-secure.middlewares=traefik-auth@file,crowdsec-bouncer@file"

networks:
  proxy:
    external: true   # comment this if you want Docker to auto-create the network
When deploying Traefik as your primary reverse proxy with Docker, here are some key points to keep in mind:
- Docker Network: Ensure all services you want Traefik to route are in the same Docker network. Typically, you create a network (e.g.,
traefik-net) (In my case, I used proxy), and attach both Traefik and your services to it.
networks:
  proxy:
    external: true
Usually, it’s a good idea to create the network beforehand. Therefore, Traefik can use the network during the deployment. To create the network in Docker, you can run –
<user>@pihole-vm-VLAN-70:~/docker$ docker network create exmaple-network
814a6c93758c55a6af67ee2b57a0a288a2ac9ec5729d57b959975224447ac8
sanju@pihole-vm-VLAN-70:~/docker$ After creating the network, you can verify using the docker command-
<user>@pihole-vm-VLAN-70:~/docker$ docker network ls
NETWORK ID     NAME              DRIVER    SCOPE
7d0c0098a487   bridge            bridge    local
4d331a9a9f70   exmaple-network   bridge    local
813e29d19142   host              host      local
cd84d0dbaeff none null localDocker Labels Use labels in your docker-compose.yml files to define routing rules for Traefik. This allows it to discover and configure services dynamically.
Exposing Ports Traefik needs to listen on ports 80 (HTTP) and 443 (HTTPS) to handle incoming requests. If using the Traefik dashboard, you also need to expose it properly.
Certificates (Optional) If you want HTTPS, set up Let’s Encrypt or bring your certificates.
In my Traefik setup, I prioritised using SSL certificates from Let’s Encrypt. To achieve this, I created and mounted a file acme.json in the configuration directory, where Traefik securely stores my domain’s Let’s Encrypt SSL certificates.
Additionally, I use a .env file in the root of my project directory to store sensitive credentials, including the Traefik dashboard login details. For Cloudflare integration, I keep my API token in a cf-token file. Both of these values are referenced as environment variables in my docker-compose.yml file, ensuring a secure and organised configuration.
<user>@pihole-vm-VLAN-70:~/docker$ tree traefik/
traefik/
├── cf-token
├── config
│   ├── acme.json
│   ├── config.yaml
│   └── traefik.yaml
├── docker-compose.yaml
└── logs
    ├── access.log
└── traefik.logUsing acme.json for Let’s Encrypt ensures your certificates are safely stored, and keeps credentials in .env and cf-token adds an extra layer of security.
A few best practices for your setup:
- Set Proper Permissions
acme.jsonShould be read/write only for Traefik:
chmod 0600 acme.json- This prevents unauthorised access to your certificates.
Docker Secrets (Optional)
- If you’re running Docker Swarm, consider using Docker secrets instead of
.envfor sensitive credentials.
Cloudflare API Token Scope
- Ensure the Cloudflare API token has only the required permissions (e.g., DNS edit for ACME challenge).
The traefik.yaml The file is the static configuration file for Traefik. It defines the core settings that Traefik loads when it starts up. This file is essential because Traefik has two types of configurations:
- Static Configuration (Defined in
traefik.yamlor CLI args)- Loaded at startup and cannot be changed dynamically.
- Includes settings like entry points, providers, and API/dashboard configuration.
- Dynamic Configuration (Defined via Docker labels, files, or Kubernetes)
- Managed dynamically while Traefik is running.
- Includes routers, middlewares, and services for routing traffic.
Static Configuration
My traefik.yaml file
api:
  dashboard: true
  debug: true
entryPoints:
  http:
    address: ":80"
    http:
      # middlewares: # uncomment if using CrowdSec
        #- crowdsec-bouncer@file
      redirections:
        entrypoint:
          to: https
          scheme: https
  https:
    address: ":443"
    http:
      # middlewares: # uncomment if using CrowdSec
        #- crowdsec-bouncer@file
  # tcp:
   # address: ":10000"
  # apis:
   # address: ":33073"
serversTransport:
  insecureSkipVerify: true
providers:
  docker:
    endpoint: "unix:///var/run/docker.sock"
    exposedByDefault: false
  file:
    filename: /config.yaml # example provided gives A+ rating https://www.ssllabs.com/ssltest/
certificatesResolvers:
  cloudflare:
    acme:
      # caServer: https://acme-v02.api.letsencrypt.org/directory # production (default)
      # caServer: https://acme-staging-v02.api.letsencrypt.org/directory # staging (testing)
      email: youremail # Cloudflare email (or other provider)
      storage: acme.json
      dnsChallenge:
        provider: cloudflare # change as required
        # disablePropagationCheck: true # Some people using Cloudflare note this can solve DNS propagation issues.
        resolvers:
          - "1.1.1.1:53"
          - "1.0.0.1:53"

log:
  level: "INFO"
  filePath: "/var/log/traefik/traefik.log"
accessLog:
filePath: "/var/log/traefik/access.log"Dynamic Configuration
My config.yaml
http:
  middlewares:
    traefik-auth:
      basicAuth:
        users:
          - "bcrypt-hashed password for the user"

    prometheus-auth:
      basicAuth:
        users:
          - "bcrypt-hashed password for the user"

    cadvisor-auth:
      basicAuth:
        users:
          - "bcrypt-hashed password for the user"

    #crowdsec-bouncer:
      #forwardauth:
        #address: http://bouncer-traefik:8080/api/v1/forwardAuth
        #trustForwardHeader: true

    traefik-https-redirect:
      redirectScheme:
        scheme: https

    prometheus-https-redirect:
      redirectScheme:
        scheme: https

    cadvisor-https-redirect:
      redirectScheme:
        scheme: https

    sslheader:
      headers:
        customRequestHeaders:
X-Forwarded-Proto: httpsYou can combine all middleware definitions into one config.yaml file (this is usually the easiest to manage):
There are a few things to remember when you work with Traefik, the most important of which is when you add a config.yaml file with multiple services, like the one below, you don’t need an .env file to store dashboard credentials. Instead, you have to hash the user and password to a single hashed password for Traefik and all the services you will add to Traefik to route traffic.
This includes the username and password.
Also, the HTTP to HTTPS redirection.
Then mount it like you already do:
- /home/<user>/docker/traefik/config:/etc/traefik/config:roYou don’t need to mount the config.yaml file in the Docker Compose definitions for those individual services. You are adding to Tarefik to manage traffic.
Only Traefik needs to mount this config file: (check your file path, meaning where is the leading Traefik directory within your Docker host)
Key Sections in traefik.yaml
- Entry Points: Define which ports Traefik listens on (e.g., HTTP/HTTPS).
- Providers: Tell Traefik where to get service configurations (Docker, Kubernetes, etc.).
- API: Enables the Traefik dashboard.
- CertificatesResolvers: Configures Let’s Encrypt for automatic HTTPS.
This file is usually mounted in a Docker setup like this:
volumes:
      - /etc/localtime:/etc/localtime:ro
      - /var/run/docker.sock:/var/run/docker.sock:ro
      - /home/<user>/docker/traefik/config/traefik.yaml:/traefik.yaml:ro
      - /home/<user>/docker/traefik/config/acme.json:/acme.json
      - /home/<user>/docker/traefik/config:/etc/traefik/config:ro
- /home/<user>/docker/traefik/logs:/var/log/traefikTo obtain an SSL certificate with Traefik, you must own a domain from a registrar or provider. I chose Cloudflare for my domain setup, but many other options are available.
Domain Ownership Verification for Let’s Encrypt
Before issuing an SSL certificate, Let’s Encrypt requires proof that you own the domain. There are three ways to achieve this:
- DNS Challenge
- Creates a special DNS TXT record in your domain settings.
- Works even when your server is behind a firewall or NAT.
- Ideal for wildcard certificates (
*.example.com).
- TLS Challenge
- Requires Traefik to serve a temporary TLS certificate.
- Requires direct HTTPS access to your server on port 443.
- HTTP Challenge
- Places a special file on your web server (
.well-known/acme-challenge/). - Requires port 80 to be open.
- Places a special file on your web server (
DNS Challenge
Since I am using Proxmox for virtualisation, I preferred not to expose any additional ports on my firewall. The DNS challenge was the best choice because:
- It works without opening ports 80 or 443.
- It allows issuing wildcard SSL certificates (
*.mydomain.com). - It integrates well with Cloudflare via API, automating the process.
This approach ensures a secure and automated SSL certificate setup while protecting my network.
Conclusion
After deploying my Traefik proxy, everything worked as expected. I’m excited to experiment more with Traefik in future projects, but for now, I can confidently say it’s a fantastic tool that’s well worth learning.