
Journey from traditional monolithic deployments to modern, Infrastructure-as-Code (IaC) practices using AWS CloudFormation.
Deploying applications can often be a time-consuming and complex process. In my early experiences, especially when deploying applications like WordPress, I relied on a monolithic architecture. In this setup, all components, including the web server, application logic (PHP), and database (MySQL) ran on a single virtual machine. Typically, I’d use low-cost shared CPU instances from hosting providers like Linode or DigitalOcean. While this method was straightforward and affordable, it was only suitable for low-traffic websites or personal projects that didn’t demand high availability or scalability.
However, this approach presented several drawbacks. Hosting everything on a single server created significant risks, such as single points of failure; if one component failed, the entire site could become unavailable. Moreover, this architecture lacked flexibility, making it challenging to scale resources in response to traffic spikes or handle growing user demands effectively.
To address these limitations, I moved toward using Docker containers, which significantly improved my workflow. Docker allowed me to package my applications and their dependencies into standardised units, making deployment consistent, lightweight, and portable across different environments. While Docker improved the deployment process, it didn’t fully solve the challenges of managing infrastructure at scale or achieving true automation and reproducibility.
That’s when cloud services, particularly AWS CloudFormation, became an attractive solution. AWS CloudFormation is an Infrastructure-as-Code (IaC) service that lets you define, provision, and manage your infrastructure using simple code templates, typically written in YAML or JSON. For this project, I chose YAML due to its simplicity, readability, and ease of maintenance.
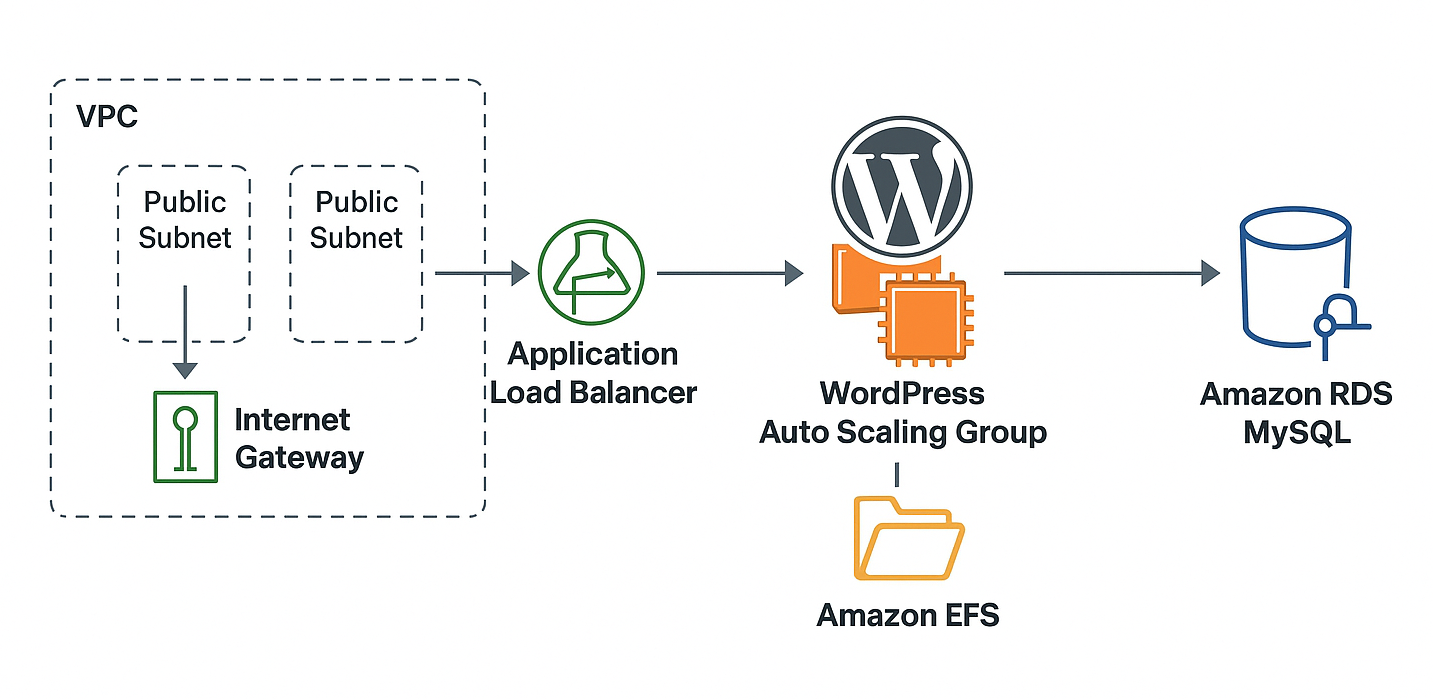
With CloudFormation, I was able to describe my entire WordPress infrastructure stack as code, including:
- Virtual Private Cloud (VPC) for secure and isolated networking.
- Elastic Compute Cloud (EC2) instances to run WordPress within an Auto Scaling Group for high availability and scaling.
- Application Load Balancer (ALB) to distribute incoming traffic efficiently.
- Amazon RDS (Relational Database Service) for managed MySQL databases.
- Amazon Elastic File System (EFS) to store WordPress files persistently and reliably.
Adopting AWS CloudFormation significantly streamlined my deployment process, reducing the manual overhead and potential human errors. Additionally, it improved my application’s availability, resiliency, and scalability, ensuring that my infrastructure could easily handle increases in traffic and gracefully recover from failures.
For this project, I aimed to create a resilient and scalable WordPress deployment that could be easily replicated across different AWS regions whenever required. Having this flexibility ensures that my infrastructure can adapt seamlessly to changing requirements or regional availability considerations. In the sections below, I’ll walk you through my CloudFormation YAML file in detail, clearly explaining the architecture, the various AWS resources provisioned, and how each component contributes to the overall resilience, scalability, and maintainability of the WordPress installation.
Every CloudFormation deployment begins with a YAML file, which serves as a blueprint describing the entire set of infrastructure components your application requires. In this YAML file, you explicitly declare each resource and service that AWS CloudFormation will provision and configure. By defining your infrastructure as code in this way, you gain the benefits of consistency, reproducibility, and easier management across environments or deployments.
Parameters Section
The CloudFormation template begins with a Parameters section, which is essential for customising your deployment. This section lets you define user-supplied values needed to create and configure your infrastructure. Here’s a breakdown of the parameters used in this WordPress project:
- KeyName (SSH Key):
This parameter specifies the name of an existing SSH key pair you’ve previously created in the AWS Console. You’ll need this key pair to connect (SSH) to your EC2 instances securely. When initiating the CloudFormation stack, you’ll be prompted to enter the key name. - DBUsername and DBPassword (Database Credentials):
Here, you define your database administrator username and password. You can also specify constraints, such as the allowed password length and permitted character patterns. These parameters ensure that your database credentials follow security best practices. - InstanceType (EC2 Instance Type):
As the name indicates, this parameter defines the type of EC2 instance you’ll be launching. For this particular project, I’ve selected thet2.microBecause it qualifies for the AWS Free Tier, the instance type helps keep costs minimal during development or personal use. TheAllowedValuesattribute provides a list of permissible instance types, ensuring users can only select supported options. - LatestAmiId (Amazon Linux 2 AMI):
This parameter retrieves the latest available Amazon Linux 2 AMI ID for the AWSeu-west-2(London) region from AWS Systems Manager (SSM) Parameter Store. UtilizingAWS::SSM::Parameter::Value, the AMI ID is dynamically fetched, ensuring your EC2 instances always launch with the most recent and secure operating system version. This approach simplifies maintenance, as there’s no manual updating of AMI IDs whenever Amazon releases updates.
AWSTemplateFormatVersion: '2010-09-09'
Description: "CloudFormation template to deploy WordPress on t2.micro with RDS, EFS, ALB and Launch Template in eu-west-2"

Parameters:
  KeyName:
    Description: Name of an existing EC2 KeyPair to enable SSH access
    Type: AWS::EC2::KeyPair::KeyName
  DBUsername:
    Description: The database admin account username
    Type: String
    MinLength: 1
    MaxLength: 16
    Default: wordpress
    AllowedPattern: '[a-zA-Z][a-zA-Z0-9]*'
    ConstraintDescription: must begin with a letter and contain only alphanumeric characters.
  DBPassword:
    Description: The database admin account password
    Type: String
    NoEcho: true
    MinLength: 8
    MaxLength: 41
    AllowedPattern: '[a-zA-Z0-9]*'
    ConstraintDescription: must contain only alphanumeric characters.
  InstanceType:
    Description: EC2 instance type
    Type: String
    Default: t2.micro
    AllowedValues:
      - t2.micro
  LatestAmiId:
    Type: AWS::SSM::Parameter::Value<AWS::EC2::Image::Id>
    Default: /aws/service/ami-amazon-linux-latest/amzn2-ami-hvm-x86_64-gp2
    Description: Latest Amazon Linux 2 AMI ID for eu-west-2
Clearly defining these parameters makes your CloudFormation template flexible, secure, and easy to manage or replicate across different environments or AWS regions.
Resources Section
In the Resources section of your CloudFormation template, you explicitly define all the AWS resources required for your deployment. This includes everything from your network infrastructure to computing instances and storage services.
In this section, you’ll typically start by defining the core networking components necessary for your deployment, including:
- Virtual Private Cloud (VPC):
The VPC provides an isolated, logically separate network environment within AWS, where you have complete control over the virtual networking resources. - Subnets:
Subnets are segments within your VPC. Multiple subnets are typically deployed across different Availability Zones (AZs) for resilience and high availability. Public subnets host resources accessible from the Internet, such as your web servers or Application Load Balancer. - Route Tables:
Route tables control the routing of traffic within your VPC. They determine how network packets move between subnets and to external networks, like the Internet. - Internet Gateway:
An internet gateway enables communication between your VPC and the internet, allowing resources in public subnets to receive inbound traffic and initiate outbound connections.
Resources:
  VPC:
    Type: AWS::EC2::VPC
    Properties:
      CidrBlock: 10.0.0.0/16
      EnableDnsSupport: true
      EnableDnsHostnames: true
      Tags:
        - Key: Name
          Value: wordpress-vpc

  InternetGateway:
    Type: AWS::EC2::InternetGateway
    Properties:
      Tags:
        - Key: Name
          Value: wordpress-igw

  VPCGatewayAttachment:
    Type: AWS::EC2::VPCGatewayAttachment
    Properties:
      VpcId: !Ref VPC
      InternetGatewayId: !Ref InternetGateway
By clearly defining these networking components within the Resources section, you establish a solid, secure, and scalable network foundation on which to host your WordPress application and associated AWS services.
Public Subnets Configuration (PublicSubnetA & PublicSubnetB)
To achieve high availability and resilience, I’ve configured two public subnets within separate Availability Zones (AZs). Placing subnets in different AZs ensures that your infrastructure remains operational even if one availability zone encounters issues or downtime.
Each subnet has the following characteristics:
- Location within the VPC:
Both public subnets are created inside the same VPC as your Application Load Balancer (ALB) and EC2 instances. This setup enables efficient internal communication between resources. - Automatic Public IP Assignment:
Instances launched into these subnets are configured to receive public IP addresses automatically. This simplifies access from the internet and is helpful for direct SSH connections and initial configuration steps. - Subnet Tagging:
Each subnet is tagged clearly with a descriptive name (e.g.,wordpress-subnet-a,wordpress-subnet-b) for easier identification and management within the AWS Console. - Internet Connectivity via Route Tables:
Both public subnets are associated with a dedicated route table that contains a default route pointing to an Internet Gateway. This configuration ensures your EC2 instances and the ALB have direct internet access for inbound and outbound traffic. - Multi-purpose Usage:
The public subnets serve multiple purposes:- Hosting EC2 instances that run your WordPress application.
- Hosting the Application Load Balancer, which efficiently distributes incoming traffic to your WordPress servers.
- Hosting Amazon EFS mount targets, enabling persistent file storage across EC2 instances.
  PublicSubnetA:
    Type: AWS::EC2::Subnet
    Properties:
      VpcId: !Ref VPC
      CidrBlock: 10.0.1.0/24
      AvailabilityZone:
        Fn::Select:
          - 0
          - Fn::GetAZs: ""
      MapPublicIpOnLaunch: true
      Tags:
        - Key: Name
          Value: wordpress-subnet-a

  PublicSubnetB:
    Type: AWS::EC2::Subnet
    Properties:
      VpcId: !Ref VPC
      CidrBlock: 10.0.2.0/24
      AvailabilityZone:
        Fn::Select:
          - 1
          - Fn::GetAZs: ""
      MapPublicIpOnLaunch: true
      Tags:
        - Key: Name
          Value: wordpress-subnet-b
By distributing resources across two public subnets in separate AZs, your deployment achieves enhanced scalability, resiliency, and availability, essential for robust and reliable infrastructure.
Public Route Table Configuration (PublicRouteTable)
The PublicRouteTable is a crucial networking component within your CloudFormation template. It manages the routing of network traffic for resources located in your public subnets.
Key characteristics of the public route table are:
- Creation within the VPC:
The route table is explicitly created within the same VPC as your public subnets, ensuring proper connectivity and isolation from other network environments. - Default Route to Internet Gateway:
A default route (0.0.0.0/0) is defined within the route table, pointing directly to an Internet Gateway. This configuration ensures that any resource associated with this route table (such as your EC2 instances and ALB) can send traffic out to the internet and receive incoming requests. - Subnet Associations:
The public subnets (PublicSubnetAandPublicSubnetB) are explicitly associated with this route table. This allows the instances within these subnets to utilise this route table’s configuration, ensuring seamless internet connectivity.
 PublicRouteTable:
    Type: AWS::EC2::RouteTable
    Properties:
      VpcId: !Ref VPC
      Tags:
        - Key: Name
          Value: wordpress-public-rt

  PublicRoute:
    Type: AWS::EC2::Route
    Properties:
      RouteTableId: !Ref PublicRouteTable
      DestinationCidrBlock: 0.0.0.0/0
      GatewayId: !Ref InternetGateway

  SubnetARouteTableAssociation:
    Type: AWS::EC2::SubnetRouteTableAssociation
    Properties:
      SubnetId: !Ref PublicSubnetA
      RouteTableId: !Ref PublicRouteTable

  SubnetBRouteTableAssociation:
    Type: AWS::EC2::SubnetRouteTableAssociation
    Properties:
      SubnetId: !Ref PublicSubnetB
      RouteTableId: !Ref PublicRouteTable
This configuration enables your infrastructure components (like EC2 instances running WordPress and your Application Load Balancer) to communicate efficiently with the internet, facilitating updates, inbound user traffic, and general operational management.
Security Groups Configuration (ALBSecurityGroup)
Security groups act as virtual firewalls, controlling inbound and outbound traffic between AWS resources. For this project, I configured dedicated security groups for the Application Load Balancer (ALB), EC2 instances, RDS database, and EFS file system. These security groups ensure secure and organised network communication.
Key characteristics of these security groups include:
- Location within the VPC:
All security groups are created within the same VPC as your subnets, ensuring secure and efficient communication among your AWS resources. - Controlled Traffic Flow:
Each security group has clearly defined rules to allow necessary traffic between components:- ALBSecurityGroup: Allows incoming HTTP (port 80) and HTTPS (port 443) traffic from the internet.
- EC2SecurityGroup: This group permits HTTP traffic from the ALB and SSH access (port 22) from anywhere for administrative purposes.
- RDSSecurityGroup: Enables MySQL (port 3306) connections specifically from your EC2 instances.
- EFSSecurityGroup: This group allows Network File System (NFS) traffic (port 2049) exclusively from EC2 instances for mounting shared file storage.
- Clear Tagging:
Each security group is tagged with descriptive names (e.g.,wordpress-alb-sg,wordpress-ec2-sg, etc.), simplifying management and identification in the AWS Console.
ALBSecurityGroup:
    Type: AWS::EC2::SecurityGroup
    Properties:
      GroupDescription: Allow HTTP and HTTPS to ALB
      VpcId: !Ref VPC
      SecurityGroupIngress:
        - IpProtocol: tcp
          FromPort: 80
          ToPort: 80
          CidrIp: 0.0.0.0/0
        - IpProtocol: tcp
          FromPort: 443
          ToPort: 443
          CidrIp: 0.0.0.0/0

  EC2SecurityGroup:
    Type: AWS::EC2::SecurityGroup
    Properties:
      GroupDescription: Allow HTTP from ALB and SSH from anywhere
      VpcId: !Ref VPC
      SecurityGroupIngress:
        - IpProtocol: tcp
          FromPort: 80
          ToPort: 80
          SourceSecurityGroupId: !Ref ALBSecurityGroup
        - IpProtocol: tcp
          FromPort: 22
          ToPort: 22
          CidrIp: 0.0.0.0/0

  RDSSecurityGroup:
    Type: AWS::EC2::SecurityGroup
    Properties:
      GroupDescription: Allow MySQL from EC2
      VpcId: !Ref VPC
      SecurityGroupIngress:
        - IpProtocol: tcp
          FromPort: 3306
          ToPort: 3306
          SourceSecurityGroupId: !Ref EC2SecurityGroup

  EFSSecurityGroup:
    Type: AWS::EC2::SecurityGroup
    Properties:
      GroupDescription: Allow NFS from EC2
      VpcId: !Ref VPC
      SecurityGroupIngress:
        - IpProtocol: tcp
          FromPort: 2049
          ToPort: 2049
          SourceSecurityGroupId: !Ref EC2SecurityGroup
By thoughtfully defining and applying these security groups, your deployment maintains strict security controls while ensuring smooth, reliable network connectivity between all essential resources.
Amazon EFS Configuration (WordPressEFS)
To ensure persistent and shared storage for WordPress, particularly for the wp-content directory (which stores uploads, themes, and plugins), I’ve integrated Amazon Elastic File System (EFS) into this architecture. EFS enables multiple EC2 instances to mount and access the same file system concurrently, which is ideal in an autoscaling environment.
Key aspects of the EFS setup:
- Created within the same VPC:
The EFS file system is deployed in the same VPC as the EC2 instances and other components, enabling seamless internal communication. - Performance Mode:
The EFS is configured in the General Purpose performance mode, which is ideal for latency-sensitive applications like WordPress. - Encryption at Rest:
The file system is encrypted at rest using AWS-managed encryption keys to enhance data security. This ensures that stored data is protected without manual key management. - Tagged for Easy Identification:
The EFS is tagged with a clear name (wordpress-efs), allowing you to locate and manage it within the AWS Console easily. - Mount Targets in Public Subnets:
EFS mount targets are provisioned in each of the public subnets (where the EC2 instances reside), enabling high availability and low-latency access from all instances regardless of their placement. - Security Group Access:
The mount targets are associated with the same security group as the EC2 instances. This allows secure NFS (port 2049) traffic between the instances and the EFS. - Mounted by EC2 Instances:
During instance initialisation (via UserData), each EC2 instance mounts the EFS volume to the/var/www/html/wp-contentdirectory, ensuring that uploaded files, themes, and plugins are preserved across instance restarts or replacements.
  WordPressEFS:
    Type: AWS::EFS::FileSystem
    Properties:
      PerformanceMode: generalPurpose
      Encrypted: true
      FileSystemTags:
        - Key: Name
          Value: wordpress-efs

  EFSSubnetA:
    Type: AWS::EFS::MountTarget
    Properties:
      FileSystemId: !Ref WordPressEFS
      SubnetId: !Ref PublicSubnetA
      SecurityGroups:
        - !Ref EFSSecurityGroup

  EFSSubnetB:
    Type: AWS::EFS::MountTarget
    Properties:
      FileSystemId: !Ref WordPressEFS
      SubnetId: !Ref PublicSubnetB
      SecurityGroups:
        - !Ref EFSSecurityGroup
Using EFS in this way ensures that your WordPress environment remains stateful, persistent, and reliable, even when scaling across multiple EC2 instances.
Amazon RDS Configuration (DBSubnetGroup & WordPressDB)
To provide a managed, scalable, and reliable database backend for WordPress, this project uses Amazon RDS (Relational Database Service) with a MySQL engine. RDS handles much of the undifferentiated heavy lifting involved in database management, such as backups, patching, failover, and monitoring.
Key details of the configuration:
- DBSubnetGroup:
This defines the subnets across multiple Availability Zones where the RDS instance can launch. In this project, the same public subnets used by the EC2 instances are specified, ensuring that the EC2 application layer can connect to the database without cross-VPC or routing complexities. - RDS Instance (WordPressDB):
- Engine: Configured to use MySQL, which is fully compatible with WordPress and widely supported.
- Instance Class: Uses
db.t3.micro, which is cost-effective and eligible for the AWS Free Tier (ast2.microis not supported for newer MySQL engine versions). - Engine Version: Set to the latest stable version of MySQL to ensure access to the newest features and security updates.
- VPC Placement: Launched within the same VPC as the EC2 instances and other components, ensuring fast and secure connectivity.
- Security Group: Configured to allow MySQL traffic (port 3306) exclusively from the EC2 instances, reducing exposure and maintaining security best practices.
- Database Name, Username, and Password: These values are defined in the Parameters section of the CloudFormation template and are reused here to ensure consistency with the WordPress application’s
wp-config.php. - DBSubnetGroupName: Links the instance to the subnet group mentioned above to ensure multi-AZ resilience and controlled network placement.
DBSubnetGroup:
    Type: AWS::RDS::DBSubnetGroup
    Properties:
      DBSubnetGroupDescription: Subnets for RDS
      SubnetIds:
        - !Ref PublicSubnetA
        - !Ref PublicSubnetB
      DBSubnetGroupName: wordpress-db-subnet-group

  WordPressDB:
    Type: AWS::RDS::DBInstance
    Properties:
      Engine: mysql
      EngineVersion: 8.0
      DBInstanceClass: db.t3.micro
      AllocatedStorage: 20
      MasterUsername: !Ref DBUsername
      MasterUserPassword: !Ref DBPassword
      DBName: wordpress
      VPCSecurityGroups:
        - !Ref RDSSecurityGroup
      DBSubnetGroupName: !Ref DBSubnetGroup
      MultiAZ: false
      PubliclyAccessible: false
By using Amazon RDS for the WordPress database, you gain the benefits of a fully managed service, including automated backups, patch management, performance monitoring, and the option to scale the instance if traffic demands increase easily. This results in a WordPress stack that’s resilient, secure, and production-ready—even for personal projects.
Application Load Balancer (WordPressALB)
This project includes an application load balancer (alb) to handle incoming traffic efficiently and ensure that the WordPress site remains available even as backend EC2 instances scale up or down. The ALB plays a central role in managing HTTP requests and distributing them evenly across the EC2 instances running WordPress.
Key characteristics of the ALB configuration:
- Deployed within the same VPC:
The ALB is created within the same Virtual Private Cloud (VPC) as the EC2 instances and subnets, allowing for seamless internal routing and integration with other components. - Uses the HTTP protocol:
The listener is configured to accept HTTP traffic on port 80. (You can easily extend this setup later to include HTTPS by attaching an SSL certificate through AWS Certificate Manager.) - Security Group Configuration:
The ALB is associated with its dedicated security group, which permits inbound HTTP (and optionally HTTPS) traffic from the Internet. This security group also allows traffic to flow from the ALB to the EC2 instances on port 80, as defined in the EC2 security group rules. - Target Group Association:
The ALB forwards incoming HTTP requests to a Target Group containing the EC2 instances. This setup allows the ALB to monitor instance health and route traffic only to healthy targets, improving the WordPress site’s reliability and user experience. - Listener Configuration:
The ALB includes an HTTP listener, which checks for incoming requests on port 80 and uses the defined target group as its default action. Depending on your use case, you can later extend this to include listener rules for host-based or path-based routing.
WordPressALB:
    Type: AWS::ElasticLoadBalancingV2::LoadBalancer
    Properties:
      Subnets:
        - !Ref PublicSubnetA
        - !Ref PublicSubnetB
      SecurityGroups:
        - !Ref ALBSecurityGroup
      Scheme: internet-facing

  WordPressTargetGroup:
    Type: AWS::ElasticLoadBalancingV2::TargetGroup
    Properties:
      Port: 80
      Protocol: HTTP
      VpcId: !Ref VPC
      TargetType: instance
      HealthCheckProtocol: HTTP
      HealthCheckPath: /

  ALBListenerHTTP:
    Type: AWS::ElasticLoadBalancingV2::Listener
    Properties:
      LoadBalancerArn: !Ref WordPressALB
      Port: 80
      Protocol: HTTP
      DefaultActions:
        - Type: forward
          TargetGroupArn: !Ref WordPressTargetGroup

  InstanceProfile:
    Type: AWS::IAM::InstanceProfile
    Properties:
      Roles:
        - !Ref EC2Role
By using an Application Load Balancer in this architecture, you achieve fault tolerance, high availability, and scalability. The load balancer ensures that traffic is automatically balanced across all running WordPress instances and that users experience minimal downtime.
IAM Role and Instance Profile (EC2Role & InstanceProfile)
This setup includes an IAM role and an associated instance profile to securely grant permissions to the EC2 instances without embedding AWS credentials into the server. This is a best practice in AWS environments, enabling EC2 instances to access AWS services securely and with fine-grained control.
Key characteristics of the configuration:
- EC2Role:
- This IAM role allows EC2 instances to assume it via the AWS Security Token Service (STS).
- The trust relationship is configured to permit EC2 to assume this role, using the following policy:
{
  "Version": "2012-10-17",
  "Statement": [
    {
      "Effect": "Allow",
      "Principal": {
        "Service": "ec2.amazonaws.com"
      },
      "Action": "sts:AssumeRole"
    }
  ]
}- While the base template might not attach specific permissions to the role yet, this setup prepares the instance to interact with other AWS services such as CloudWatch Logs, S3, or Systems Manager, if extended in the future.
- InstanceProfile:
- An instance profile is required to attach an IAM role to an EC2 instance.
- This instance profile is referenced in the EC2 Launch Template so that any launched EC2 instance automatically inherits the permissions associated with the role.
- VPC Context:
While IAM roles are global resources (not limited to a VPC), they are intended to be used within the same VPC as the EC2 instances, ensuring that they’re directly tied to the infrastructure components being deployed.
EC2Role:
    Type: AWS::IAM::Role
    Properties:
      AssumeRolePolicyDocument:
        Version: '2012-10-17'
        Statement:
          - Effect: Allow
            Principal:
              Service: ec2.amazonaws.com
            Action: sts:AssumeRole
This architecture adheres to AWS security best practices by defining an IAM role and instance profile. It ensures that EC2 instances can safely interact with other AWS services without needing embedded credentials.
Launch Template for EC2 Instances (WordPressLaunchTemplate)
The Launch Template defines how EC2 instances are configured and provisioned within the Auto Scaling Group. It includes everything from the AMI, instance type, security settings, to the UserData script that automates WordPress setup.
Key highlights of the configuration:
- Scoped to the VPC/Subnets:
While the Launch Template itself is not a VPC-scoped resource, it is designed to provision EC2 instances in the same VPC and public subnets as defined earlier in the template. This ensures full connectivity to the ALB, RDS, and EFS resources. - Uses the Latest Amazon Linux 2 AMI:
The template uses the latest Amazon Linux 2 AMI, which is dynamically retrieved via the AWS Systems Manager Parameter Store. This guarantees that your instances always launch with the most up-to-date OS image, reducing the need for manual maintenance. - Instance Type from Parameters:
The EC2 instance type is pulled from theInstanceTypeparameter t2.micro in this project allows easy template adjustment or reuse for different environments. - Security Groups and IAM Role:
The template references the EC2 security group and the instance profile (IAM role) created earlier to enforce secure communication and grant appropriate permissions. - UserData Bootstrapping Script:
The heart of the Launch Template is its UserData section. This script runs automatically when an instance boots and performs the following tasks:- Installs Apache, PHP, MySQL client, and EFS utilities.
- Enables and starts the Apache service.
- Mounts the EFS volume to
/var/www/html/wp-contentfor persistent WordPress storage. - Downloads and unpacks the latest WordPress release.
- Adjusts permissions for the
apacheuser. - Copies and edits
wp-config.phpto connect WordPress with the RDS database using parameters from the stack.
WordPressLaunchTemplate:
    Type: AWS::EC2::LaunchTemplate
    Properties:
      LaunchTemplateName: wordpress-lt
      LaunchTemplateData:
        InstanceType: !Ref InstanceType
        KeyName: !Ref KeyName
        ImageId: !Ref LatestAmiId
        SecurityGroupIds:
          - !Ref EC2SecurityGroup
        IamInstanceProfile:
          Name: !Ref InstanceProfile
        UserData:
          Fn::Base64: !Sub |
            #!/bin/bash
            #Enable & install PHP-8.0 via Amazon Linux Extras just make sure you install the latest version as the wordpress
            amazon-linux-extras enable php8.0
            yum clean metadata
            yum install -y httpd php php-mysqlnd amazon-efs-utils

            #Start and enable Apache so the it start everytime when the system boots
            systemctl enable httpd
            systemctl start httpd

            #Mount the EFS for wp-content
            mkdir -p /var/www/html/wp-content
            mount -t efs -o tls ${WordPressEFS}:/ /var/www/html/wp-content
            echo "${WordPressEFS}:/ /var/www/html/wp-content efs defaults,_netdev 0 0" >> /etc/fstab

            #Download and unpack WordPress
            cd /var/www/html
            curl -O https://wordpress.org/latest.tar.gz
            tar -xzf latest.tar.gz --strip-components=1
            chown -R apache:apache /var/www/html

            #Configure wp-config.php
            cp wp-config-sample.php wp-config.php
            sed -i "s/database_name_here/wordpress/" wp-config.php
            sed -i "s/username_here/${DBUsername}/" wp-config.php
            sed -i "s/password_here/${DBPassword}/" wp-config.php
            sed -i "s|define( 'DB_HOST', '.*' );|define( 'DB_HOST', '${WordPressDB.Endpoint.Address}:3306' );|" wp-config.php
            #Final restart the httpd service
            systemctl restart httpd
By defining all of this in a Launch Template, your WordPress instances are provisioned in a consistent, repeatable, and automated way, perfect for Auto Scaling environments and production-grade deployments.
Auto Scaling Group
The Auto Scaling Group (ASG) is a key component in this architecture that ensures your WordPress application can automatically scale based on load and recover from instance failures without manual intervention. It works in conjunction with the Launch Template to dynamically manage EC2 instances.
Key details of the Auto Scaling Group configuration:
- Launch Template Reference:
The ASG uses the WordPressLaunchTemplate defined earlier. This ensures that any new instances the ASG launches will use the exact configuration, including AMI, instance type, security group, and the WordPress installation script. - Subnet Placement (VPCZoneIdentifier):
The ASG spans both PublicSubnetA and PublicSubnetB, distributing instances across multiple Availability Zones (azs). This avoids reliance on a single AZ and improves fault tolerance and availability. - Desired, Minimum, and Maximum Capacity:
DesiredCapacity: Set to1The ASG will maintain one running instance under normal conditions.MinSize: Ensures at least one instance is always running.MaxSize: Allows scaling up to two instances if needed. This can be increased later to handle higher traffic volumes.
- Target Group Registration:
The ASG is connected to the WordPressTargetGroup, which the Application Load Balancer monitors. This ensures that only healthy instances receive traffic, and unhealthy instances are replaced automatically. - Instance Tagging:
The instances launched by the ASG are tagged withName: wordpress-instanceTags are used for easy identification in the EC2 console. They are also helpful in organising resources and automating workflows like backups or monitoring.
AutoScalingGroup:
   Type: AWS::AutoScaling::AutoScalingGroup
   Properties:
    VPCZoneIdentifier:
      - !Ref PublicSubnetA
      - !Ref PublicSubnetB

    LaunchTemplate:
      LaunchTemplateId: !Ref WordPressLaunchTemplate
      Version: !GetAtt WordPressLaunchTemplate.LatestVersionNumber

    MinSize: '1'
    MaxSize: '2'
    DesiredCapacity: '1'
    TargetGroupARNs:
      - !Ref WordPressTargetGroup

    Tags:
      - Key: Name
        Value: wordpress-instance
        PropagateAtLaunch: true
With this Auto Scaling Group in place, your WordPress infrastructure becomes highly resilient and self-healing. Whether you experience a spike in traffic or an EC2 instance failure, the ASG ensures your application remains available with minimal manual effort.
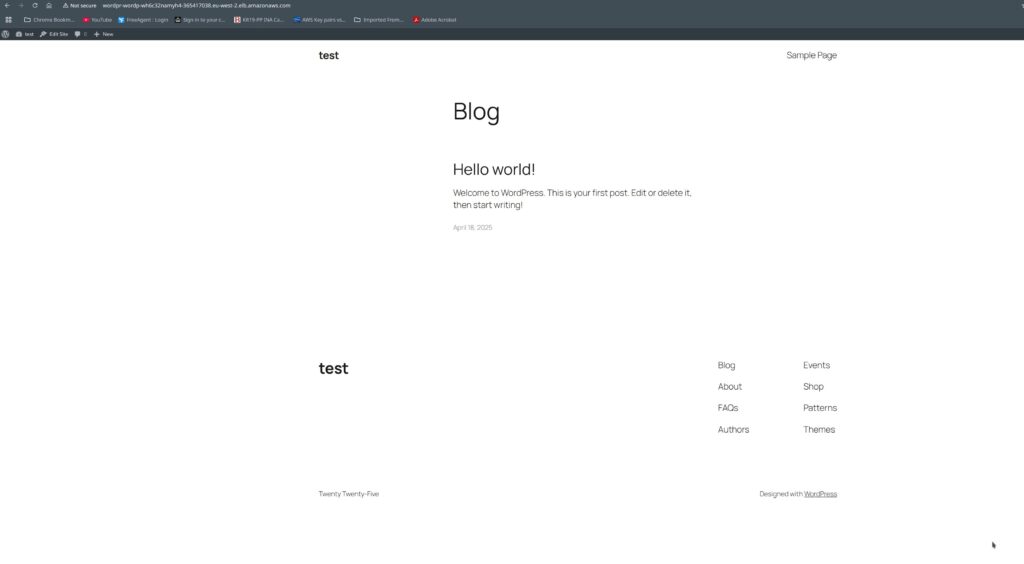
Outputs Section (WebsiteURL)
The Outputs section in a CloudFormation template allows you to return useful information once the stack has been successfully created. In this project, I’ve included an output named WebsiteURL, which provides the direct link to the newly deployed WordPress site.
Key characteristics of the output:
- Constructed from the ALB DNS Name:
The URL is dynamically built using the DNS name of the Application Load Balancer (ALB). This ensures no hardcoding is required, and the endpoint is always accurate, even if redeployed in a different region or environment. - Returned as a Stack Output:
Once the stack is created, CloudFormation will include the WordPress site’s URL in the Outputs section of the stack. This makes it easy to find and access your site immediately after deployment. - Viewable in the AWS Console:
You can access the output by going to: mathematicaCopyEditAWS Console → CloudFormation → Your Stack → Outputs TabFrom there, you’ll see a key namedWebsiteURLwith a value like: pgsqlCopyEdithttp://your-load-balancer-name.eu-west-2.elb.amazonaws.com/
Outputs:
  WebsiteURL:
    Value: !Sub "http://${WordPressALB.DNSName}/"
This simple but powerful feature ensures you never need to manually look up the ALB endpoint. CloudFormation surfaces it automatically so that you can use your WordPress site immediately.