

Exploring Homelab Service Exposure
When I set up my homelab with Proxmox VE, I wanted to discover secure ways to expose internal services to the wider internet. However, I quickly learned that it can be a complex process, especially when balancing privacy and security. This document explores two methods, Cloudflare Tunnels and Pangolin Server, and the nuances surrounding them.
Cloudflare Tunnel Overview
A popular approach to exposing internal services is through a Cloudflare Tunnel, which creates a secure, outbound-only connection from your server to Cloudflare’s network. By installing a lightweight cloudflared agent (either in a Docker container or Docker CLI), you can establish an encrypted tunnel without opening ports on your firewall—a significant advantage for security.
Zero Trust Model
Cloudflare Tunnels use a Zero-Trust security model, meaning there’s no need for traditional port forwarding. Instead, all traffic goes through Cloudflare, reducing the surface area for direct attacks on your network. Zero-trust principles emphasise continuous verification of both user identity and device posture.
Key Benefit: You avoid opening inbound ports on your router or exposing your IP address directly.
Privacy Concerns with Cloudflare Tunnels
Despite the security benefits, privacy can be a sticking point:
- Cloudflare Observes Tunnel Traffic
All data, including request URLs, headers, and client IP addresses, flows through Cloudflare’s network. Even if you use HTTPS, Cloudflare terminates TLS on its servers before passing traffic downstream to your origin service. You must trust Cloudflare not to inspect, log, or misuse that data. - Compliance & Trust
Sensitive data could raise compliance issues (GDPR, HIPAA, etc.). If you’re privacy-focused, you may not want a third party logging access to internal services. Your origin server remains somewhat hidden, but a central authority (Cloudflare) mediates every request.
Summary: Cloudflare Tunnels offer strong security and convenience, but require entrusting your traffic to Cloudflare.
Discovering Pangolin
Motivated by the potential drawbacks of a third-party service, I explored Pangolin Server, a self-hosted, privacy-focused reverse proxy and zero-trust tunnelling solution. Like Cloudflare Tunnel or ngrok, Pangolin eliminates third-party dependencies, allowing you to keep traffic within your infrastructure.
How Pangolin Works
- Public-Facing VPS
Pangolin requires a VPS (or any server with a public IP) to act as the entry point. This could be hosted on AWS, Linode, DigitalOcean, or similar providers. - Client-Server Model
A lightweight client runs on your homelab, connecting to the Pangolin server. When an external request arrives at your VPS, Pangolin securely forwards it to the relevant service inside your homelab. - Open-Source & Lightweight
Pangolin is open-source and provides essential features such as authentication and encryption while remaining with minimal overhead.
Newt & WireGuard
Pangolin integrates two powerful networking tools:
- Newt: A tool that simplifies exposing private web apps (e.g., dashboards or dev sites) to the internet without port forwarding. It handles tunnelling and reverse proxying via Pangolin.
- WireGuard: A modern, secure VPN protocol that can link trusted networks and devices at near-native network speeds.
Why Both?
Newt handles HTTP/HTTPS-based tunneling, while WireGuard can manage full VPN tunnels for broader use cases. Together, they enable flexible, highly secure connectivity options.
My Deployment with Pangolin
I used an AWS T2 Micro instance (1 vCPU, 1GB RAM, 8GB SSD) to host my Pangolin Server. While the Pangolin documentation provides an automatic installation script, I chose manual setup to understand each configuration file better and the moving parts. Below is a high-level overview of the steps I followed:
- Spin Up VPS
Create an EC2 T2 Micro instance on AWS (or use another provider). Ensure you have security group rules allowing inbound SSH (for management) and relevant ports (e.g., 80/443 and UDP 51820 ) if you plan to serve HTTP/HTTPS. - Install Dependencies
Update system packages, then install any dependencies required by Pangolin (e.g.,curl,wget, or language runtimes if needed). - Install Docker –
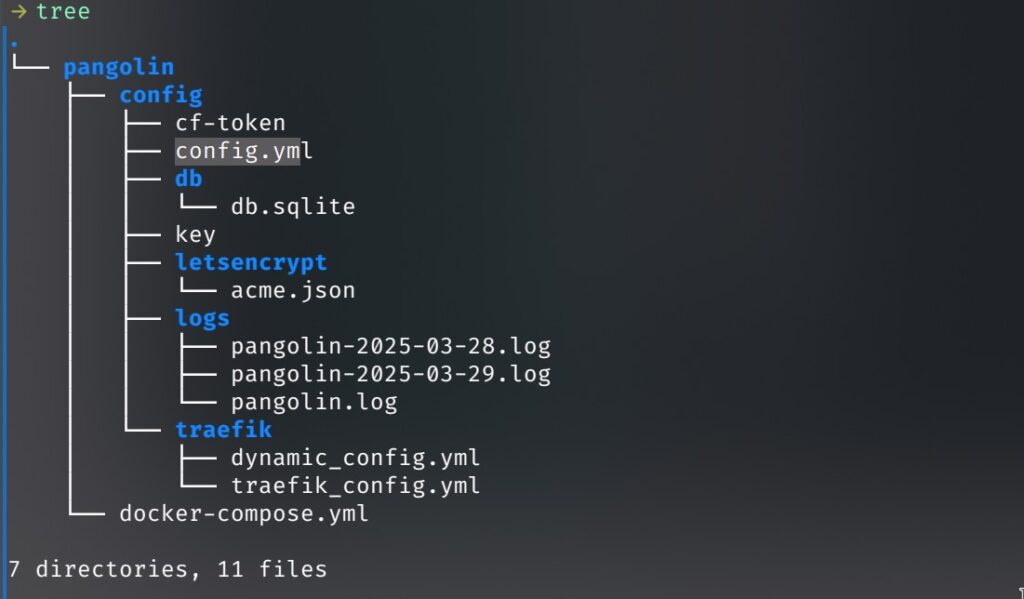
Installing docker on Ubuntu https://docs.docker.com/engine/install/ubuntu/ - Configure Pangolin– Below is an example directory structure that I use for my Pangolin-based deployment. It helps organise configuration for Traefik, Let’s Encrypt certificates, and Pangolin’s main configuration file (
config.yml). You can adapt this structure depending on your environment:
- traefik_config.yml typically defines Traefik’s entry points (
:80and:443), the ACME challenge configuration, and any middleware or router rules. - acme.json is where Traefik stores the Let’s Encrypt SSL certificates. Make sure to secure this file with proper permissions (e.g.,
chmod 600). - config.yml is the heart of Pangolin’s configuration, specifying:
- Domains/Subdomains you want to tunnel
- Authentication settings (e.g., tokens, Basic Auth, or other methods)
- TLS (whether Pangolin should handle certificates or leave that to Traefik)
- Plugins like Newt or Gerbil
- dynamic_config.yml– The dynamic configuration file defines the HTTP routers and services for the Pangolin frontend and backend.
By splitting these config files, you can more easily manage and track changes in version control. Each component (Pangolin, Traefik, Let’s Encrypt) stays organised in its folder.
- Start the Pangolin Service
Launch Pangolin using the docker command-
sudo docker compose up -d- Set Up the Client
Install and configure the Pangolin client on your homelab machine(s) to connect back to your VPS. - DNS Configuration
Point a domain or subdomain to your VPS public IP. If you’re using a wildcard domain, ensure Pangolin is appropriately configured to handle multiple subdomains. - Testing
Verify that your internal service (e.g., the Proxmox dashboard, a web app, or any homelab service) is now securely reachable through the Pangolin tunnel.
Watch My Video
For a more hands-on walkthrough, you can watch my brief tutorial:
Notes
- Port-Free Tunnelling: Both Cloudflare Tunnels and Pangolin avoid the need for port forwarding, simplifying firewall management.
- Privacy vs. Convenience: Cloudflare Tunnels offer managed convenience but place trust in Cloudflare’s infrastructure. Pangolin requires more setup but ensures you retain complete control of your data.
- Customisation: With Pangolin, you can integrate your own authentication, certificates, and identity providers, which is especially critical in privacy-focused or compliance-driven environments.
- Expandability: Tools like Newt and WireGuard can further enhance your setup, allowing you to fine-tune how services are exposed and how your networks communicate.
By learning and configuring Pangolin manually, I gained valuable insights into how its components interact. This approach provides a privacy-conscious alternative to Cloudflare Tunnels while still delivering a secure, zero-trust way to expose homelab services to the internet.
I have included my configuration files for this project below–
docker-compose.yaml-
services:
  pangolin:
    image: fosrl/pangolin:1.1.0
    container_name: pangolin
    restart: unless-stopped
    volumes:
      - ./config:/app/config
    healthcheck:
      test: ["CMD", "curl", "-f", "http://localhost:3001/api/v1/"]
      interval: "3s"
      timeout: "3s"
      retries: 5

  gerbil:
    image: fosrl/gerbil:1.0.0
    container_name: gerbil
    restart: unless-stopped
    depends_on:
      pangolin:
        condition: service_healthy
    command:
      - --reachableAt=http://gerbil:3003
      - --generateAndSaveKeyTo=/var/config/key
      - --remoteConfig=http://pangolin:3001/api/v1/gerbil/get-config
      - --reportBandwidthTo=http://pangolin:3001/api/v1/gerbil/receive-bandwidth
    volumes:
      - ./config/:/var/config
    cap_add:
      - NET_ADMIN
      - SYS_MODULE
    ports:
      - 51820:51820/udp
      - 443:443 # Port for traefik because of the network_mode
      - 80:80 # Port for traefik because of the network_mode
  traefik:
    image: traefik:v3.3.3
    container_name: traefik
    restart: unless-stopped
    network_mode: service:gerbil # Ports appear on the gerbil service
    depends_on:
      pangolin:
        condition: service_healthy
    command:
      - --configFile=/etc/traefik/traefik_config.yaml
      # Add the environment variables for your DNS provider.
    environment:
      CLOUDFLARE_DNS_API_TOKEN: "your cloudflare DNS API Token"
    volumes:
      - /home/ubuntu/docker/pangolin/config/traefik:/etc/traefik:ro # Volume to store the Traefik configuration
      - /home/ubuntu/docker/pangolin/config/letsencrypt:/letsencrypt # Volume to store the Let's Encrypt certificates
networks:
  default:
    driver: bridge
name: pangolindynamic_config.yaml-
# dynamic_config.yaml  (sanitised)

http:
  middlewares:
    redirect-to-https:
      redirectScheme:
        scheme: https

  routers:
    # 1) HTTP -> HTTPS redirect
    main-app-router-redirect:
      rule: "Host(`app.example.com`)"   # ← your public domain
      service: next-service
      entryPoints:
        - web                           # ← your HTTP entryPoint name
      middlewares:
        - redirect-to-https

    # 2) App router (everything EXCEPT /api/v1/* and websockets)
    next-router:
      rule: "Host(`app.example.com`) && !PathPrefix(`/api/v1`)"
      service: next-service
      entryPoints:
        - websecure                     # ← your HTTPS entryPoint name
      tls:
        certResolver: cloudflare-dns    # ← whatever you named your cert resolver
        domains:
          - main: example.com
            sans:
              - "*.example.com"

    # 3) API router (/api/v1/*)
    api-router:
      rule: "Host(`app.example.com`) && PathPrefix(`/api/v1`)"
      service: api-service
      entryPoints:
        - websecure
      tls:
        certResolver: cloudflare-dns

    # 4) WebSocket router (if your API exposes WS)
    ws-router:
      rule: "Host(`app.example.com`)"
      service: api-service
      entryPoints:
        - websecure
      tls:
        certResolver: cloudflare-dns

  services:
    next-service:
      loadBalancer:
        servers:
          - url: "http://app-backend:3002"   # ← internal container/service + port

    api-service:
      loadBalancer:
        servers:
          - url: "http://api-backend:3000"   # ← internal container/service + port
config.yaml-
app:
    dashboard_url: "https://pangolin.example.com"
    log_level: "info"
    save_logs: true

domains:
    domain1:
        base_domain: "example.com"
        cert_resolver: "letsencrypt"
        prefer_wildcard_cert: true

server:
    external_port: 3000
    internal_port: 3001
    next_port: 3002
    internal_hostname: "pangolin"
    session_cookie_name: "p_session_token"
    resource_access_token_param: "p_token"
    resource_session_request_param: "p_session_request"

traefik:
    cert_resolver: "letsencrypt"
    http_entrypoint: "web"
    https_entrypoint: "websecure"

gerbil:
    start_port: 51820
    base_endpoint: "eample.com"
    use_subdomain: false
    block_size: 24
    site_block_size: 30
    subnet_group: 100.89.137.0/20

rate_limits:
    global:
        window_minutes: 1
        max_requests: 100

email:
    smtp_host: "smtp.gmail.com"
    smtp_port: 587
    smtp_user: "email@youremail.com"
    smtp_pass: "password"
    no_reply: "email@youremail.com"

users:
    server_admin:
        email: "email@youremail.com"
        password: "password"

flags:
    require_email_verification: true
    disable_signup_without_invite: true
    disable_user_create_org: true
    allow_raw_resources: true
allow_base_domain_resources: truetraefik_config.yaml-
api:
  insecure: true
  dashboard: true

providers:
  http:
    endpoint: "http://pangolin:3001/api/v1/traefik-config"
    pollInterval: "5s"
  file:
    filename: "/etc/traefik/dynamic_config.yaml"

experimental:
  plugins:
    badger:
      moduleName: "github.com/fosrl/badger"
      version: "v1.0.0"

log:
  level: "INFO"
  format: "common"

certificatesResolvers:
  letsencrypt:
    acme:
      dnsChallenge:
        provider: "cloudflare" # your DNS provider
        # see https://doc.traefik.io/traefik/https/acme/#providers
      email: "email@youremail.com"
      storage: "/letsencrypt/acme.json"
      caServer: "https://acme-v02.api.letsencrypt.org/directory"

entryPoints:
  web:
    address: ":80"
  websecure:
    address: ":443"
    transport:
      respondingTimeouts:
        readTimeout: "30m"
    http:
      tls:
        certResolver: "letsencrypt"

serversTransport:
  insecureSkipVerify: true